I have been wanting to do a tutorial series on basic pattern draping and drafting for some time now.
There is a lot of information involved and I wasn’t sure how to break it all down and it seemed like such a big job. But needed.
So today I present to you:
DRAPING AND CREATING A BASIC BODICE SLOPER: THE FRONT
What is a sloper if you don’t already know? A master pattern from which you can create many other designs from. Pretty awesome.
First I’d like to tell you a little bit about my background in pattern making, and how I originally learned to make them.
When I went to FIDM to study fashion design in the early nineties there were some very good teachers who came from a time when things were still made beautifully, with lots of attention to construction details.
One of my intructors:
Connie Amaden Crawford. If you are interested in fashion draping Connie Amaden Crawford is the author of the quintessential draping textbook, The Art Of Fashion Draping. ( affiliate link) She has several books on pattern making, draping, pattern grading, fitting, and also a pattern line available through her website and Amazon if you would like to learn more about her.
Ms. Crawford was an exacting teacher and I learned a lot in her classes, although at the time I thought she was maybe too demanding. I stayed up many a night trying to get things just right for her class. She taught me pattern drafting, and pattern grading.
My draping teacher was actually an elderly gentleman who always wore a suit and a pocket square with beautiful brushed back silver hair. He was very elegant and I wish I could remember his name as he worked at some very high end companies back in the fifties and sixties. Anyway, I was very well prepared when I later went on to work in the industry briefly after graduating. And even though I stopped working to be a stay at home mom, many of the foundational lessons I learned in those basic classes were ingrained as I came back to making clothes after too many years away.
I’ve been going through many of my old notes I found and textbooks to try to put something together I can present to you as a tutorial here on the blog.
Do you have a dress form and aren’t sure how to use it yet?
Once you have a few basic blocks created, designing is quite simple.
Let’s get started!
What do you need?
A dress form
pins
fabric
scissors
a tracing wheel
A quilter’s ruler.
a pen
paper ( I use freezer paper sometimes)
a cutting mat if you have one( helps with tracing lines.)
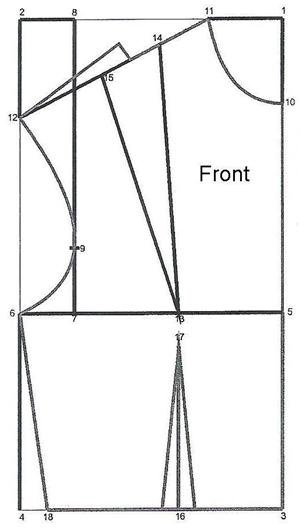
1. When draping a basic block, we drape only one half of the form. Later, we will cut out both sides to test the fit. But for now to drape the front, you will need a piece of fabric about 5 inches longer then the neck to waist on the form, and 5 inches wider than the center front to side seam. Before you start pinning the fabric on the form draw the CROSS GRAIN LINE near the middle of the fabric. Lay that on the form across the bust line and mark the APEX, or bust point. Pin the fabric at the apex, the center front waist, neck and apex points, making sure the fabric is on the STRAIGHT GRAIN and 45 degrees across on the center front all the way to the side seam arm plate.
2. Next, drape the waist dart. Clip the fabric at the princess line almost to the waist line.The line going straight down on the form between the CF (center front) and side seam is the PRINCESS LINE.
3 & 4. Pin at the side seam and center front waist points. First, make sure the fabric is falling correctly from the side seam armplate. It should hang straight down, not looking crooked.Smooth the fabric at the waist over from the center front waist and put a pin at the princess line. Now smooth the fabric over from the side seam waist to the princess line/ waist point. The fabric will gap because of the bust and that extra fabric will form the front waist dart. Fold the excess over and pin it shut. The bigger the bust, the bigger the dart!
BTW my dress form is wearing a bra because it’s the same measurements as me except for there, so I padded it out with my bra. I do have a tutorial for padding your dress form if you find you are a little too curvy for it. My waist is a tiny bit bigger, and my shoulders are more narrow so when I make my final muslin, I will fit it on myself and make a few small adjustments. To see my blog on customizing your dress from click here.
5. Pin at the side seam armplate and smooth the fabric up and over the armplate towards the neck. Draping feels like sculpting, smoothing things carefully, then pinning them.
6. Use your pencil to trace the side seam, waist seam and neckline. Clip into the fabric at the neckline to smooth out the neckline drape. Now pin at the shoulder armplate point and pin the excess fabric that has gathered up there between the should arm point and neck point into another dart on the princess line. Pin it closed. Mark the armplate screw and the middle of the armplate between the shoulder and side seam. Make sure you mark the spot where each dart ends as well as each dart leg.
7& 8 .TRUE UP meaning draw lines in with a ruler, your rough lines you made on the dress form.
You are probably wondering what the deal is with that shoulder dart about now, right? Will you have a weird dart at your shoulder ? Nope. We are going to slash the pattern and pivot the dart excess into the bottom dart. Another method is to pivot the shoulder dart into the armhole. Some designs need you to use a two dart basic bodice sloper as your foundation, and some need a one dart sloper as a foundation. Today we are making a one dart sloper. …
REDRAW the dart, ending it at the apex on the crossgrain line. Keep the dart the same at the bottom of the dart legs.
Now… iron your fabric pattern, and tape it to paper. If you have a cutting mat place it under the fabric between it and the paper. Use your TRACING WHEEL to trace the pattern lines. When you remove the fabric, you will see all of the little dots impressed in the paper and will need to trace them with your pencil and ruler, making sure to trace in the new darts. My camera couldn’t pick up the details. They are hard to see.
9. Above is my traced and trued pattern piece. To move the shoulder dart, cut through the CENTER of both darts until almost touching the apex. Pivot the top dart closed. The bottom dart will automatically become wider! COOL, isn’t it!? Once my dart was closed and my bottom dart got really big, I patched it from behind with some scratch paper. See number 13 below.
10. SQUARE the edges of the pattern. I show this before I changed the dart but it doesn’t matter.
11. Time to add some FUNCTIONAL EASE. This keeps you from feeling like you are wearing an Elizabethan corset. Minimum ease recommended in the bust area is two inches for comfort. Also now is the time to lower the armhole a bit, too. Make a mark one inch under the armhole and 1/2 inch out from the side seam. Redraw your armhole. If you have a FRENCH CURVE ruler, it’s very helpful. I couldn’t find mine so I just drew it free hand. Now you can lower your neckline about 1/4 inch as well.I also added 3/8 inch seams all around the pattern.
12. To finish the dart you redrew you will need to fold the dart closed and cut along the seam line you drew at the waist. When you open it , it will look like a typical dart.
So there is my rough front bodice sloper. Join me tomorrow to see how the back bodice is made.
Then I will make a final muslin, work out any kinks and transfer that to Manila paper.
If you have any questions leave a comment!
RESOURCE: Sew Country Chick. Sign up for an e mail subscription here!
Rubber stamping is a hugely popular activity that is enjoyed by people with and without formal art training. Rubber stamps have been in use for a long time for commercial purposes and in crafts, and have been used in fine art since the DADA era. They are easy to print and provide a quick way to make multiple copies. These qualities make rubber stamping attractive for smaller scale and ephemeral art forms such as greeting cards, pins, and mail art, although many artists create large scale art works with rubber stamps or use them as accents on larger pieces. You can buy rubber stamps in just about any design or motif you can imagine, or adapt stamps that were originally made for business use. Nothing beats the creative possibilities, however, of carving your own.
(FYI: unless you want to buy stock in band aids, make sure to cut AWAY from your fingers, unlike what you may see here in this video
What you’ll need:
• A carving tool – Without a doubt the Speedball Lino Cutter is the carving tool of choice and can be found at most arts & craft stores. There are lots of other brands out there, so don’t worry if you can’t find a Speedball, just look for a Linoleum Cutter.
• Carving Material – If you’re just getting started you can practice on small plastic erasers, or purchase rubber stamping material which should be in the same section of your craft store. There are several brands out there, and you may want to try a few till you find something you like to work with. They all carve slightly different, but some are less likely to crumble.
• Ink pads – Not only will you need ink to actually use your stamp, you’ll need it to test your stamp and make sure you’ve carved away enough of the rubber surrounding your stamp.
• Obviously you’ll also need a soft pencil, some paper, and if you have an Exacto knife they can come in handy as well.
Carving
Create a simple design to start, one with simple positive and negative shapes.
The raised area will print and the carved area will not.
*** DON'T FORGET that your design will print in REVERSE.
Swoon (born Caledonia Dance Curry, in 1978) is a street artist who specializes in life-size wheatpaste prints and paper cutouts of human figures. She studied at the Pratt Institute in Brooklyn and started doing street art around 1999 and large-scale installations in 2005.
Swoon regularly pastes works depicting people, often her friends and family, on the streets around the world. She usually pastes her pieces on uninhabited locations such as abandoned buildings, bridges, fire escapes, water towers and street signs. Her work is inspired by both art historical and folk sources, ranging from German Expressionist wood block prints to Indonesian shadow puppets.
Swoon started her street art in 1999. At the time she was attending the Pratt Institute, studying painting. However, she began to feel restrained by the sense that her life was already laid out for her. She believed that she would simply paint a few pictures that would end up on a wall in a gallery or someone’s home. Her art would only be seen by those affluent enough to go to galleries and buy art. At the same time she was trying to find what she describes as context. She stated that she wanted to become part of the world. Her response to this desire was what she believes to be a very literal one: gluing her art to walls.
Wheat pasting became a way for her to discover and understand her impact in the world. Swoon describes that as a young woman, she did not have a sense of her ability to make a change. By putting up a small wheat paste sticker, she was able to transform a wall and it would be there when she walked past it the next day. It was a tiny literal change.[2]
The majority of Swoon’s street art consists of portraits. She believes that we store things in our body and that a portrait can become an x-ray of those experiences. She wants her portraits to capture something essential in the subject. She tries to document something she loves about the subject and has seen in him or her. It is a way to connect with the subject. By putting the portraits on the streets she is allowing for others to witness this connection and make their own.[3]
One such connection, she says, has stuck with her throughout the years, as she mentions it in multiple interviews. She met a woman who asked her about a small piece of art that she had put up in a neighborhood. The woman proceeded to tell her that a mentally disabled man who lived in the neighborhood had started to call it “The Secret” and he would take people to it and show them. The little piece had become a special thing in the community. This moment has had an impact on Swoon, telling her that one tiny thing can make an opportunity for connection and can inspire the feeling that maybe there is another world existing around us and that we only need a perception shift in order to see it. She has since tried to evoke this in all of her other artwork. Originally she believed her series of portraits would be a two-month project but she has continued to make them for over ten years.[2]
Living in New York City had a great impact on Swoon as an artist. She loved its graffiti, its layers, and others' feelings toward the graffiti and other aspects of the city. She wanted to interact with the layers of the city, what she describes as “the naturally occurring collage of the city”. Her first series of prints were done on tracing paper so that the colors of the walls and the chipping paint could still be seen. Her prints tried to create life in what would be an otherwise dead space.[4]
This article contains everything an Art student needs to know about drawing in one point perspective. It includes step-by-step tutorials, lesson plans, handouts, videos and free downloadable worksheets. The material is suitable for middle and high school students, as well as any other person who wishes to learn how to draw using single point perspective. It is written for those with no prior experience with perspective, beginning with basic concepts, before working towards more complex three-dimensional forms.
…a mathematical system for representing three-dimensional objects and space on a two-dimensional surface by means of intersecting lines that are drawn vertically and horizontally and that radiate from one point on a horizon line…
Although this definition sounds complicated, the concept is relatively simple. One point perspective is a drawing method that shows how things appear to get smaller as they get further away, converging towards a single ‘vanishing point’ on the horizon line. It is a way of drawing objects upon a flat piece of paper (or other drawing surface) so that they look three-dimensional and realistic.
Drawing in one point perspective is usually appropriate when the subject is viewed ‘front-on’ (such as when looking directly at the face of a cube or the wall of building) or when looking directly down something long, like a road or railway track. It is popular drawing method with architects and illustrators, especially when drawing room interiors. To understand more about the history of perspective in art, please read our accompanying Guide to Linear Perspective (coming soon). Note: If you need to draw something that is not facing you directly, but rather has a corner nearest to you, two point perspective is likely to be more appropriate.
Rules of perspective: true shapes, vanishing points and horizon lines
In one point perspective, surfaces that face the viewer appear as their true shape, without any distortion. They are drawn using primarily horizontal and vertical lines, as illustrated by the diagram below: In this one point perspective photo, surfaces facing the viewer are undistorted and show their true shape. For example, we see the side of the bath, window and facing surfaces as ordinary squares and rectangles. Their sides are parallel with the edges of the photograph.
Surfaces that travel away from the viewer, on the other hand, converge towards a single ‘vanishing point‘. This is a point that is located directly in front of the viewer’s eyes, on a ‘horizon line’ (also known as an ‘eye level line’), as illustrated in the photo below:
All receding edges of the buildings in this one point perspective photo angle towards the single vanishing point. The position of the vanishing point tells us that the photographer was crouching down, with his eye level lowered.
It is possible to draw over photographs to identify vanishing points, horizon lines and true shapes. Studying the work of famous artists can also help you gain an understanding of one point perspective, as shown in the example by Vincent van Gogh below. ‘Bedroom in arles’ by Vincent van Gogh – identifying perspective lines Key Points:
Surfaces that face the viewer are drawn using their true shape
Surfaces that travel away from the viewer converge towards a single vanishing point
One point perspective tutorial
The following tutorial explains how to draw one point perspective step-by-step. The exercises are designed to be completed in the order given, with each one building upon the previous task. All worksheets are available as a free perspective drawing PDF that can be printed at A4 size (more worksheets will be added to this over time).
The downloadable PDF has been provided by the Student Art Guide for classroom use and may be issued freely to students (credited to studentguide.com), as well as shared via the social media buttons at the bottom of this page. The worksheets may not be published online or shared or distributed in any other way, as per our terms and conditions.
Recommended Equipment:
Mechanical or ‘clutch’ pencil (with an HB or 2H lead)
Blank paper and/or the printed worksheets
A ruler and compass can be useful while learning to draw in one point perspective, however most Art students find that these exercises are best completed freehand, with dimensions and proportions gauged by eye. This is so that the skills are easily transferrable to an observational drawing.
EXERCISE 1: CUBES AND RECTANGULAR BLOCKS
Drawing rectangular blocks is often the first one point perspective lesson given to students. It is a simple exercise that provides a solid foundation for things to come.
Exercise 2: stacking, holes and angles
Exercise 3: perspective block letters
Drawing block lettering in one point perspective is a relatively straight-forward task, suitable for a homework activity. The following video demonstrates how to do this:
Exercise 4: finding centres and equal spaces
This video explains how to equally divide items in one point perspective, allowing you to draw fence posts, lamp posts, and equally spaced windows or buildings.
By the completion of this exercise, you should be able to:
Find the centre of any rectangular surface using the ‘corner to corner’ method (this works even on surfaces that are receding towards the vanishing point)
Divide the surface of any rectangular block into any number of equal parts
Draw tiles on a floor in one point perspective
Draw repeating elements, such as fence posts, receding into the distance
This is explained in the following video tutorial:
Exercise 5: one point perspective cityscape
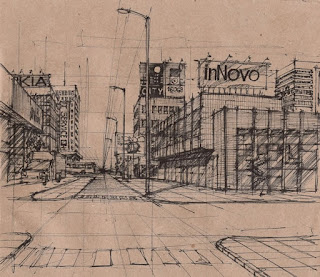
Drawing a road and surrounding cityscape (either imagined or observed from real life) is a great follow-up activity to the previous exercises. A one point perspective street scene typically combines repetitive manmade elements with stacked, cut and angular forms. This exercise can be as challenging or minimal as desired, allowing able students to move ahead and produce detailed, elaborate drawings.
The most challenging aspect of perspective is drawing curving or circular forms. These are typically sketched freehand, inside squares or rectangles to help get proportions correct.
By the completion of this exercise, you should be able to:
Use the technique of ‘crating’ – drawing complex forms inside rectangular boxes
Draw circles, cylinders and cones in one point perspective, from a range of different angles
Use straight lines (guidelines) to aid the drawing of irregular curves, such as the curving forms of rivers or trees in a one point perspective landscape
Understand that:
Circles or curving forms that face the viewer are drawn using their true shape
Circles that recede towards the vanishing point appear distorted, appearing smaller as they get further away
These concepts are explained in the following video:
A one point perspective drawing by Stephanie Sipp, professor at Florida State College of Jacksonville, Interior Design department: Stephanie Sipp has produced many stunning perspective illustrations. In this example, we see that details and curved edges have been added to simple rectangular block forms to create one point perspective furniture. Notice how the pattern also conforms to the rules of perspective. A perspective landscape by Vincent van Gogh: Landscapes and perspective scenery abide by the same rules of perspective. In this ink landscape by Vincent van Gogh, the trunk heights disappear towards the vanishing point on the horizon. A drawing by high school student Estherlicious: This O Level Art final piece was awarded an ‘A’ grade. The positioning of the curving forms used throughout the car interior demonstrates a sound understanding of perspective.
Exercise 7: one point perspective room
The most common perspective drawing lesson is a one point perspective room. Interiors combine a multitude of skills and can be made as challenging or involved as required. Perspective flooring allows you to practise dividing surfaces into equal spaces, while the questions of how to draw a window in perspective; furniture / desks / beds; or adjoining corridors etc provide a challenge regardless of your ability level. To gain ideas about how you might approach drawing interiors in perspective, we have included a range of examples below, including bedrooms, living rooms, kitchens and hallways. Drawing a room in one point perspective can be great practise for those who wish to later pursue interior design, architecture or for those who are studying Design Technology at high school.
The illustration above shows a one point perspective grid (this may be downloaded and printed for classroom use) which may be drawn on directly or traced over, using a lightbox. To understand how to draw a room in one point perspective, please view our step-by-step video:
This is the completed final work (tone applied using water colour) from the one point perspective bedroom tutorial shown in the video above – a teaching exemplar by Amiria Robinson. A one point perspective room by Dutch renaissance architect, painter and engineer, Jans Vredeman de Vries: It is clear in this one point perspective room drawing that an underlying grid has been useful. A one point perspective interior by Amani Cagatin: This sequence of drawings shows how complex furniture in the living room were ‘crated’ (drawn inside boxes) before details and curves were added in. A one point perspective bedroom by Cheryl Teh Veen Chea of One Academy: Many students begin drawing an interior by launching in with furniture and windows. It is important to remember that you can manipulate the shape of the room itself. In this example an open closet and a raised floor area to create a visually interesting interior, before the other elements are added. Note the attention to detail in this drawing, with feature wallpaper, shoes and clothes added as finishing touches. A one point perspective kitchen by Dana Bailey: Drawing a kitchen in perspective is another great idea. Kitchens contain a wide variety of forms and often have interesting reflective surfaces. This example contains carefully staged still life items to help complete the scene. A one point perspective hallway by Jake Mutch, completed while studying Fundamental Arts at Holland College: Drawing familiar environments, with the ability to work from observation, is often beneficial. You might choose to draw the hallway outside your classroom – with lockers and rubbish bins, as in the example above, or other internal spaces around your school. A perspective interior by S.Kim: This classroom setting has a great level of detail – note the intricate seats and desks. The horizon line is positioned at the expected level for human eyes, with the vanishing point to the left of the image, suggesting that this might be what someone sees if they stand in the doorway of the room (note that the vanishing point doesn’t need to be directly in the centre of the page – this is a common misconception). A drawing by Abby Hope Skinner, whose Top in the World A Level Art project has also featured on the Student Art Guide: This drawing shows how one point perspective can be introduced within an observation-based art project. Entitled ‘The halls kitchen and my surrogate family’, a knowledge of perspective helps to craft a convincing interior space in which figures are observed reclining on or standing around kitchen stools.GO TO: http://www.studentartguide.com/articles/one-point-perspective-drawing