5 mistakes artists make
Showing posts with label Art Related Videos. Show all posts
Showing posts with label Art Related Videos. Show all posts
Saturday, February 20, 2016

Tuesday, February 9, 2016
APPROPRIATED MATERIALS: FASHION DESIGN

Hello readers!
I have been wanting to do a tutorial series on basic pattern draping and drafting for some time now.
There is a lot of information involved and I wasn’t sure how to break it all down and it seemed like such a big job. But needed.
So today I present to you:

DRAPING AND CREATING A BASIC BODICE SLOPER: THE FRONT
What is a sloper if you don’t already know? A master pattern from which you can create many other designs from. Pretty awesome.
First I’d like to tell you a little bit about my background in pattern making, and how I originally learned to make them.
When I went to FIDM to study fashion design in the early nineties there were some very good teachers who came from a time when things were still made beautifully, with lots of attention to construction details.
One of my intructors:
Connie Amaden Crawford. If you are interested in fashion draping Connie Amaden Crawford is the author of the quintessential draping textbook, The Art Of Fashion Draping. ( affiliate link) She has several books on pattern making, draping, pattern grading, fitting, and also a pattern line available through her website and Amazon if you would like to learn more about her.
Ms. Crawford was an exacting teacher and I learned a lot in her classes, although at the time I thought she was maybe too demanding. I stayed up many a night trying to get things just right for her class. She taught me pattern drafting, and pattern grading.
My draping teacher was actually an elderly gentleman who always wore a suit and a pocket square with beautiful brushed back silver hair. He was very elegant and I wish I could remember his name as he worked at some very high end companies back in the fifties and sixties. Anyway, I was very well prepared when I later went on to work in the industry briefly after graduating. And even though I stopped working to be a stay at home mom, many of the foundational lessons I learned in those basic classes were ingrained as I came back to making clothes after too many years away.
I’ve been going through many of my old notes I found and textbooks to try to put something together I can present to you as a tutorial here on the blog.
Do you have a dress form and aren’t sure how to use it yet?
Once you have a few basic blocks created, designing is quite simple.
Let’s get started!
What do you need?
A dress form
pins
fabric
scissors
a tracing wheel
A quilter’s ruler.
a pen
paper ( I use freezer paper sometimes)
a cutting mat if you have one( helps with tracing lines.)

1. When draping a basic block, we drape only one half of the form. Later, we will cut out both sides to test the fit. But for now to drape the front, you will need a piece of fabric about 5 inches longer then the neck to waist on the form, and 5 inches wider than the center front to side seam. Before you start pinning the fabric on the form draw the CROSS GRAIN LINE near the middle of the fabric. Lay that on the form across the bust line and mark the APEX, or bust point. Pin the fabric at the apex, the center front waist, neck and apex points, making sure the fabric is on the STRAIGHT GRAIN and 45 degrees across on the center front all the way to the side seam arm plate.
2. Next, drape the waist dart. Clip the fabric at the princess line almost to the waist line.The line going straight down on the form between the CF (center front) and side seam is the PRINCESS LINE.
3 & 4. Pin at the side seam and center front waist points. First, make sure the fabric is falling correctly from the side seam armplate. It should hang straight down, not looking crooked.Smooth the fabric at the waist over from the center front waist and put a pin at the princess line. Now smooth the fabric over from the side seam waist to the princess line/ waist point. The fabric will gap because of the bust and that extra fabric will form the front waist dart. Fold the excess over and pin it shut.
The bigger the bust, the bigger the dart!
The bigger the bust, the bigger the dart!
BTW my dress form is wearing a bra because it’s the same measurements as me except for there, so I padded it out with my bra. I do have a tutorial for padding your dress form if you find you are a little too curvy for it. My waist is a tiny bit bigger, and my shoulders are more narrow so when I make my final muslin, I will fit it on myself and make a few small adjustments.
To see my blog on customizing your dress from click here.
To see my blog on customizing your dress from click here.

5. Pin at the side seam armplate and smooth the fabric up and over the armplate towards the neck. Draping feels like sculpting, smoothing things carefully, then pinning them.
6. Use your pencil to trace the side seam, waist seam and neckline. Clip into the fabric at the neckline to smooth out the neckline drape. Now pin at the shoulder armplate point and pin the excess fabric that has gathered up there between the should arm point and neck point into another dart on the princess line. Pin it closed. Mark the armplate screw and the middle of the armplate between the shoulder and side seam. Make sure you mark the spot where each dart ends as well as each dart leg.
7& 8 .TRUE UP meaning draw lines in with a ruler, your rough lines you made on the dress form.

You are probably wondering what the deal is with that shoulder dart about now, right? Will you have a weird dart at your shoulder ? Nope. We are going to slash the pattern and pivot the dart excess into the bottom dart. Another method is to pivot the shoulder dart into the armhole. Some designs need you to use a two dart basic bodice sloper as your foundation, and some need a one dart sloper as a foundation. Today we are making a one dart sloper. …
REDRAW the dart, ending it at the apex on the crossgrain line. Keep the dart the same at the bottom of the dart legs.
Now… iron your fabric pattern, and tape it to paper. If you have a cutting mat place it under the fabric between it and the paper. Use your TRACING WHEEL to trace the pattern lines. When you remove the fabric, you will see all of the little dots impressed in the paper and will need to trace them with your pencil and ruler, making sure to trace in the new darts. My camera couldn’t pick up the details. They are hard to see.

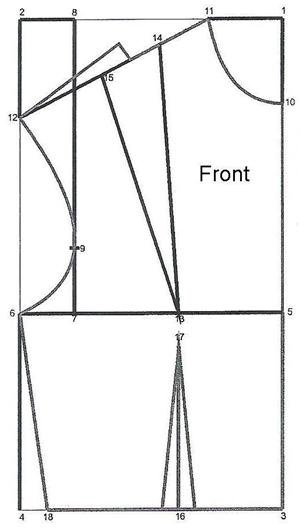
9. Above is my traced and trued pattern piece. To move the shoulder dart, cut through the CENTER of both darts until almost touching the apex. Pivot the top dart closed. The bottom dart will automatically become wider! COOL, isn’t it!? Once my dart was closed and my bottom dart got really big, I patched it from behind with some scratch paper. See number 13 below.

10. SQUARE the edges of the pattern. I show this before I changed the dart but it doesn’t matter.
11. Time to add some FUNCTIONAL EASE. This keeps you from feeling like you are wearing an Elizabethan corset. Minimum ease recommended in the bust area is two inches for comfort. Also now is the time to lower the armhole a bit, too. Make a mark one inch under the armhole and 1/2 inch out from the side seam. Redraw your armhole. If you have a FRENCH CURVE ruler, it’s very helpful. I couldn’t find mine so I just drew it free hand. Now you can lower your neckline about 1/4 inch as well.I also added 3/8 inch seams all around the pattern.
12. To finish the dart you redrew you will need to fold the dart closed and cut along the seam line you drew at the waist. When you open it , it will look like a typical dart.

So there is my rough front bodice sloper. Join me tomorrow to see how the back bodice is made.
Then I will make a final muslin, work out any kinks and transfer that to Manila paper.
If you have any questions leave a comment!
RESOURCE: Sew Country Chick. Sign up for an e mail subscription here!
MORE RESOURCES
Sunday, October 25, 2015
DRAWING - overview and demonstrations
Proko - FREE drawing lessons
Drawing a skull from Observation - DEMO
Basic Still life - Step by Step
Wednesday, October 14, 2015
M.C. Escher
Metamorphosis IIMetamorphosis II (1939 - 1940)
Posted by M. C. Escher on Monday, September 14, 2015

Friday, November 14, 2014
OUR LAST SCHOOL CAC MEETING
AGENDA
1. Discuss Club @ the DCCA: Permission Slips and Bus stops must be completed and confirmed ASAP
2. Drawing Lesson: OPTICAL ILLUSION LADDER
1. Discuss Club @ the DCCA: Permission Slips and Bus stops must be completed and confirmed ASAP
THE DCCA
The DCCA, founded in 1979, presents over 30 exhibitions annually of regionally, nationally and internationally recognized artists that explore topical issues in contemporary art and society.
200 S Madison St, Wilmington, DE 19801
(302) 656-6466
Monday
|
Closed
|
Tuesday
|
10:00 am – 5:00 pm
|
Wednesday
|
12:00 – 5:00 pm
|
Thursday
|
10:00 am – 5:00 pm
|
*Friday
|
10:00 am – 5:00 pm
|
Saturday
|
10:00 am – 5:00 pm
|
Sunday
|
12:00 – 5:00 pm
|
* FIRST FRIDAY: ART ON THE TOWN
Sponsored by the City of Wilmington, Art on the Town is a great way to view the exhibitions in our galleries and visit the artist studios during our extended gallery hours. Held on the first Friday of the month, Art on the Town is free and open to the public. 5 - 9 pm unless otherwise noted.
DCCA Studios open 5 pm - 9 pm.
Sunday, September 21, 2014




Thursday, September 18, 2014
ELEMENTS & PRINCIPLES OF ART: EMPHASIS & PaTtErN The Art of GustavKlimt: CAC Wks. 3, 4, & 5
Artist of Inspiration: Gustav Klimt |
| The Kiss, Gustav Klimt Notice the juxtaposition of the abstract patterning and the realistic figures. |
THE PROJECT:
Looking at the work of Austrian Art Nouveau painter, Gustav Klimt for inspiration we will create elegant collaged scratchboard portraits. Line, shape, pattern, and the design principle known as Emphasis are the focus of this lesson.
Utilizing Klimt's trademark gold color and intricate pattern work, we will create inspired designs on Gold scratchboard. Patterns applied to areas around a carefully cut out figure from a magazine becomes the signature Klimt look and the focal point in the design. This is accomplished by establishing contrast between the pattern work in the figure and in the background.

Procedures:


More Resources:
See the Klimt Exhibition in Venice from 2012: http://www.mostraklimt.it/
Gustav Klimt - Web Museum: http://www.ibiblio.org/wm/paint/auth/klimt/
Expo-Klimt - Online Museum: http://www.expo-klimt.com/
(Archive) Gustav Klimt - Artchive - essay and links to images: http://www.artchive.com/artchive/K/klimt.html
Gustav Klimt Landscapes from Clark Art Institute:
See the Klimt Exhibition in Venice from 2012: http://www.mostraklimt.it/
Gustav Klimt - Web Museum: http://www.ibiblio.org/wm/paint/auth/klimt/
Expo-Klimt - Online Museum: http://www.expo-klimt.com/
(Archive) Gustav Klimt - Artchive - essay and links to images: http://www.artchive.com/artchive/K/klimt.html
Gustav Klimt Landscapes from Clark Art Institute:
Wednesday, September 10, 2014
Monday, September 1, 2014
Monday, August 25, 2014
Wednesday, August 20, 2014
Tuesday, August 19, 2014
Sunday, March 30, 2014
Drawing lessons
Really good drawing from life Tip and Tricks
HERE:http://www.learn-to-draw-lessons.com/geometric-shapes.html
*Remember, drawing from life is needed for your college portfolio
-Draw your surroundings: a messy room makes for a great subject
-Draw your friend
-Draw your shoe
HERE:http://www.learn-to-draw-lessons.com/geometric-shapes.html
*Remember, drawing from life is needed for your college portfolio
-Draw your surroundings: a messy room makes for a great subject
-Draw your friend
-Draw your shoe
Thursday, January 23, 2014
The Simpsons "Mom and Pop Art"
The Simpsons
"Mom and Pop Art"
Season 10, episode 19. 1999
Homer becomes a conceptual artist in this hilarious
episode that is chock full of great references to Art History
and Contemporary Art (Shepard Fairey!)
episode that is chock full of great references to Art History
and Contemporary Art (Shepard Fairey!)

Sunday, December 29, 2013
Street Art
The second half of the year will be devoted to generating relevant street art & ephemeral graffiti. Here are some videos to get the wheels turning, check them out:
Subscribe to:
Posts (Atom)